How to Install NFS Server on Linux Ubuntu 20.04 (Step by Step Tutorial)

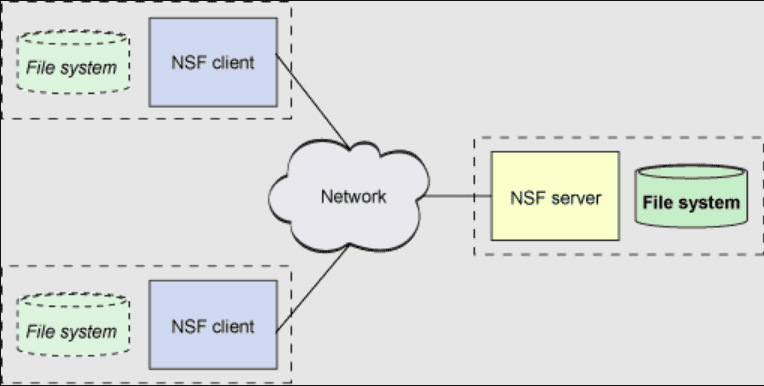
How to Install NFS Server on Linux Ubuntu 20.04.  NFS also called “Network File System” is a file sharing protocol developed by Sun’s Microsystems. It allows users to share files across the Local Area Network. It is very useful when you need to share common data to multiple clients. NFS provides a convenient way to access the remote storage over the network and mount them on the client system.

By default, the NFS protocol does not provide any user authentication or encryption. You can restrict the NFS access based on the client’s IP and hostname. NFS allows the client system to view, store and update files on the remote system.

install nfs server ubuntu 20.04

Advantages of using NFS

  • Simple and low cost solution for network file sharing.
  • Easy to install and set up.
  • Enables central administration and management of files.
  • Reduces disk space requirements for clients.
nfs server lab

In this post, we will show you how to install the NFS server on Ubuntu 20.04.

Install NFS Server on Linux Ubuntu

By default, the NFS server package is included in Ubuntu 20.04. You can install it by running the following command:

				
					apt-get install nfs-kernel-server -y


After installing the NFS server, start the NFS service and enable it to start at system reboot:

				
					systemctl start nfs-server
systemctl enable nfs-server


You can verify the status of the NFS service using the following command:

				
					systemctl status nfs-server


Sample output:

				
					● nfs-server.service - NFS server and services
     Loaded: loaded (/lib/systemd/system/nfs-server.service; enabled; vendor preset: enabled)
     Active: active (exited) since Thu 2021-11-04 08:45:06 UTC; 5s ago
   Main PID: 4198 (code=exited, status=0/SUCCESS)
      Tasks: 0 (limit: 2353)
     Memory: 0B
     CGroup: /system.slice/nfs-server.service

Nov 04 08:45:05 ubuntu2004 systemd[1]: Starting NFS server and services...
Nov 04 08:45:06 ubuntu2004 systemd[1]: Finished NFS server and services.


Create a Shared Directory on NFS Server

Next, you will need to create a directory on the NFS serve that you want to share with the client systems. Let’s create a directory named /nfs_share using the following command:

				
					mkdir /nfs_share


Next, assign proper ownership and permissions to the /nfs_share directory so it can be accessible from the client machines.

				
					chown nobody:nogroup /nfs_share
chmod -R 777 /nfs_share


Configure an NFS Exports

After creating the NFS directory, you will need to allow client systems to access the NFS share. You can do it by editing the /etc/exports file.

				
					nano /etc/exports


Add the following line:

				
					/nfs_share 192.168.0.0/24(rw,sync,no_subtree_check)


Save and close the file when you are finished. The above configuration will allow all clients in the 192.168.0.0 network to access the NFS share.

Where:


  • rw – Assign read and write
  • sync – Write changes to disk before applying them
  • no_subtree_check – Avoid subtree checking

Next, run the following command to export the shared directory and make it available to all client systems.

				
					export -a
systemctl restart nfs-server


Configure Firewall

If the UFW firewall is installed and configured on your server. Then, you will need to allow NFS service to the client network. You can allow it by running the following command:

				
					ufw allow from 192.168.0.0/24 to any port nfs


Next, reload the UFW firewall to apply the changes.

				
					ufw reload


Install NFS Client

At this point, the NFS server is installed and configured. Now, you will need to install the NFS client package on the client system. You can install it by running the following command:

				
					apt-get install nfs-common -y


Once the NFS client package is installed, you can proceed to the next step.

Mount NFS Share on Client System

First, you will need to create a directory on the client system on which you want to mount the NFS share from the server.

Let’s create a directory named client_share inside /opt directory:

				
					mkdir /opt/client_share


Now, mount the NFS share directory to the client directory using the following command:

				
					mount -t nfs -o nfsvers=3 192.168.0.100:/nfs_share /opt/client_share


Where: 192.168.0.100 is the IP address of the NFS server.

Next, verify that the NFS share directory is mounted using the following command:

				
					df -h


You should see your mounted share in the last line of the following output:

				
					Filesystem                Size  Used Avail Use% Mounted on
udev                      981M     0  981M   0% /dev
tmpfs                     199M  588K  199M   1% /run
/dev/sda1                  50G  1.8G   46G   4% /
tmpfs                     994M     0  994M   0% /dev/shm
tmpfs                     5.0M     0  5.0M   0% /run/lock
tmpfs                     994M     0  994M   0% /sys/fs/cgroup
tmpfs                     199M     0  199M   0% /run/user/0
192.168.0.100:/nfs_share   50G  2.0G   46G   5% /opt/client_share


The above command will mount the remote NFS share temporarily. To make the mounts permanent on reboot, open the /etc/fstab file:

				
					nano /etc/fstab


Add the following lines:

				
					192.168.0.100:/nfs_share /opt/client_share   nfs   defaults,timeo=900,retrans=5,_netdev	0 0


Save and close the file then run the following command to apply the changes:

				
					mount -a


Verify NFS Share

To verify the NFS share, let’s create some files and directories on the NFS server.

				
					mkdir /nfs_share/dir1
mkdir /nfs_share/dir2
touch /nfs_share/file1
touch /nfs_share/file2
touch /nfs_share/file3


Now, go back to your client system and verify all files and directories in your mounted directory:

				
					ls -l /opt/client_share


You will get the following output:

				
					drwxr-xr-x 2 root root 4096 Nov  4 09:04 dir1
drwxr-xr-x 2 root root 4096 Nov  4 09:04 dir2
-rw-r--r-- 1 root root    0 Nov  4 09:04 file1
-rw-r--r-- 1 root root    0 Nov  4 09:04 file2
-rw-r--r-- 1 root root    0 Nov  4 09:04 file3


You can also check the NFS stats using the following command:

				
					nfsstat 


You will get the following output:

				
					Client rpc stats:
calls      retrans    authrefrsh
30         0          30      

Client nfs v3:
null             getattr          setattr          lookup           access           
1         8%     4        33%     0         0%     0         0%     2        16%     
readlink         read             write            create           mkdir            
0         0%     0         0%     0         0%     0         0%     0         0%     
symlink          mknod            remove           rmdir            rename           
0         0%     0         0%     0         0%     0         0%     0         0%     
link             readdir          readdirplus      fsstat           fsinfo           
0         0%     0         0%     1         8%     1         8%     2        16%     
pathconf         commit           
1         8%     0         0%     

Client nfs v4:
null             read             write            commit           open             
6        33%     0         0%     0         0%     0         0%     0         0%     
open_conf        open_noat        open_dgrd        close            setattr          
0         0%     0         0%     0         0%     0         0%     0         0%     
fsinfo           renew            setclntid        confirm          lock             
0         0%     0         0%     4        22%     0         0%     0         0%     
lockt            locku            access           getattr          lookup           
0         0%     0         0%     0         0%     0         0%     0         0%     
lookup_root      remove           rename           link             symlink          
0         0%     0         0%     0         0%     0         0%     0         0%     
create           pathconf         statfs           readlink         readdir          
0         0%     0         0%     0         0%     0         0%     0         0%     
server_caps      delegreturn      getacl           setacl           fs_locations     
0         0%     0         0%     0         0%     0         0%     0         0%     
rel_lkowner      secinfo          fsid_present     exchange_id      create_session   
0         0%     0         0%     0         0%     8        44%     0         0%     
destroy_session  sequence         get_lease_time   reclaim_comp     layoutget        
0         0%     0         0%     0         0%     0         0%     0         0%     
getdevinfo       layoutcommit     layoutreturn     secinfo_no       test_stateid     
0         0%     0         0%     0         0%     0         0%     0         0%     
free_stateid     getdevicelist    bind_conn_to_ses destroy_clientid seek             
0         0%     0         0%     0         0%     0         0%     0         0%     
allocate         deallocate       layoutstats      clone            
0         0%     0         0%     0         0%     0         0%  


Installing NFS Server on Linux Ubuntu 20.04 Conclusion

In the above post, we explained how to install the NFS server on Ubuntu 20.04. We also explained how to share a directory using NFS and mount it on the client machine. I hope this will help you to share files using NFS on your network.

Avatar for Hitesh Jethva
Hitesh Jethva

I am a fan of open source technology and have more than 10 years of experience working with Linux and Open Source technologies. I am one of the Linux technical writers for Cloud Infrastructure Services.

0 0 votes
Article Rating
Subscribe
Notify of
0 Comments
Inline Feedbacks
View all comments
0
Would love your thoughts, please comment.x
()
x